Modern smart TVs are essentially wall-mounted computers vulnerable to software rot and glitches. While Wi-Fi updates are convenient, they are risky; a network hiccup can corrupt data or even brick the device. The manual USB Drive method offers a safer, cleaner alternative for managing your TV’s Firmware. By bypassing network variables, it ensures the update file is complete before installation begins. It is the digital equivalent of a mechanic opening the hood—a reliable, professional way to fix stability issues and extend the lifespan of your television without risking a spotty internet connection.
Diagnosing When a Manual Update Is Necessary
You generally know when an over-the-air update has failed because the symptoms are subtle but annoying. A classic sign is the "phantom update" loop. The TV notifies you that an update is available. You agree to install it. The TV restarts. Ten minutes later, the notification pops up again. This usually means the internal memory is too full to unpack the file, or the download is getting corrupted at the 99% mark.
Another realistic scenario involves hardware incompatibility. Gamers frequently encounter this when they buy a new console like a PlayStation 5 or Xbox Series X. They plug it in, expecting 4K at 120Hz, but the screen flickers or goes black. Manufacturers often patch these HDMI handshake issues months after a TV is released. If your TV's Wi-Fi module is acting up, a common failure point in aging hardware, you cannot download the patch that fixes the HDMI ports. You are stuck in a catch-22.
The USB method solves this by externalizing the heavy lifting. You use a stable computer to fetch the file. You verify the file size matches the manufacturer's website. You control the variables. This is particularly vital for home theater enthusiasts who calibrate their screens. Automated updates can sometimes reset picture settings or change local dimming algorithms. By updating manually, you choose exactly when that change happens, allowing you to document your settings first.
Preparing the Flash Drive Correctly
The physical update is easy, but preparation is where most users fail. You cannot just use a cluttered drive from your junk drawer; TVs are picky. First, check the file system. While computers use NTFS or APFS, most TVs only recognize the older FAT32 format. You must format your USB Drive to FAT32, which wipes all data, so ensure the drive is empty before starting.
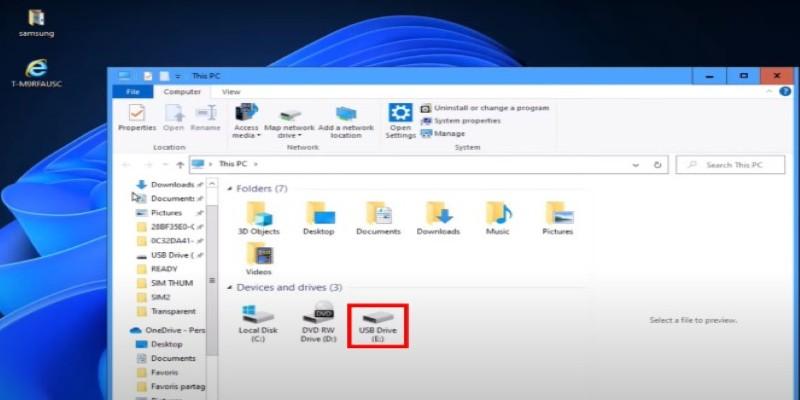
Capacity is also critical. TV’s Firmware files often exceed 1GB, so an old 512MB stick won't work; grab a drive with at least 4GB. Finally, never just copy the downloaded ZIP file. You must extract the contents. Crucially, respect the folder structure. Brands like Samsung often require the file in the "root" directory, while LG demands a specific folder named "LG_DTV." If you ignore this syntax, the TV will simply report "No File Found" and refuse to update.
Navigating the Support Site and Model Codes
Finding the correct file is an exercise in precision. You cannot search for "Samsung 4K TV update." You need the specific model code found on the white sticker on the back of the panel, not the marketing name on the box. A "Series 7" TV from 2023 has completely different internal hardware than a "Series 7" from 2024. Installing the wrong firmware can theoretically "brick" the device, rendering it useless.
Navigating the manufacturer's support page requires patience. Once you find your specific model page, look for the "Downloads" or "Drivers" section. You will often see multiple versions listed. Always grab the latest one, but check the release date. Sometimes the "latest" version on the website is actually older than what is currently on your TV if the website hasn't been maintained.
There is also the issue of regional variance. A model sold in North America often has a slightly different motherboard than the same model sold in Europe or Asia due to broadcasting standards (ATSC vs. DVB). If you bought a grey-market TV or moved internationally, the localized support site might offer a file that is incompatible with your specific unit. Always verify that the region code in the file name matches your TV’s current software version string, which you can find in the "About This TV" menu.
Executing the Installation and Troubleshooting
Once your USB Drive is prepped, the physical work begins. Reaching the ports on a wall-mounted TV can be a struggle, so use a USB extension cable if the panel is tight against the wall. You need to identify the correct input; while most ports work, prioritize one labeled "Service" or "5V 1A," as these often connect directly to the mainboard’s diagnostic bus.
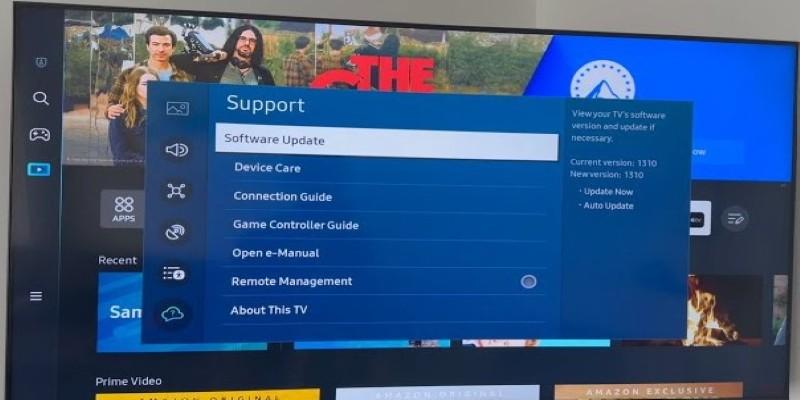
Plug the drive in while the TV is powered on. Ideally, a pop-up appears asking if you want to run a "Software Update." If not, navigate to your Settings menu, find the Support or System tab, and select "Update Now" via USB.
Then comes the anxiety phase. The screen will go black, and a progress bar will load as the TV’s Firmware overwrites the old code. Crucially, do not touch the remote or cut the power. Losing electricity during this specific window can corrupt the mainboard, effectively bricking the TV, so avoid updating during a storm.
If the TV reports "No update found," it is rarely a corrupted download and almost always a folder structure error. You likely forgot to unzip the file or missed a brand-specific folder requirement, such as "LG_DTV." Take the drive back to your computer, fix the directory, and try again. When the bar hits 100%, the TV will reboot. This restart takes longer than usual as the system rebuilds its cache, but once the picture returns, those nagging glitches should be gone.
Conclusion
Taking control of your TV’s Firmware via a manual update is a small act of technical ownership. It removes the reliance on invisible, automated systems that often fail. It forces you to understand the machine hanging on your wall not as a magic window, but as a piece of hardware that requires maintenance. The clarity of a glitch-free image and the responsiveness of a clean menu system are well worth the fifteen minutes of effort it takes to prep a flash drive and get the job done right.